Wednesday, February 28, 2007

Needle Tatting Green Silk Heart Pendant

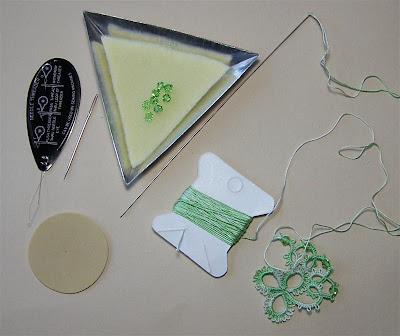
I thought I'd give you a sneak peek at what I'm working on right now. Last night I got the grand idea to create a heart pendant for my dear friend Christina who's birthday is coming up on March 17th. Currently she is deployed to Iraq so I need to be sending this soon. She loves bright green so I'm using a nice bright green variegated silk thread. Yes I said silk thread...yup I jumped right on into more difficult with my own two feet! AND it's small sized I think it is similar to a size 12 Perle and I'm using the smallest size needle, "very fine" size #8. I have to work very carefully on this one because the silk thread twists and knots very easily and it can get loose easy too (which is a good thing if I mess up LOL). I think it's going to be a delicious pendant though! I'm also adding 4mm green Swarovski Crystal beads and had to change the pattern a little for it...I wish I had done it a little differently but it still looks really nice.
I think I'm going to need to stiffen this though because it gets bent out of shape really easy...so I'm going to look into sugar water stiffening method because I don't want it to yellow or ruin the thread. I'm going to put it in a nice jewelery box so it's protected when she's not wearing it...wouldn't want bugs to get to it!
I've done the heart pattern twice already so I'm doing okay on it, it's just I have to be careful and take my time. I'm also taking breaks so I don't get too tired and start messing it up.
I love my friend dearly and it is worth all the work and effort to make this for her! I know she will cherish and take good care of it too.

Tuesday, February 27, 2007

Needle Tatting Heart Pendant

I turned the Clover Leaf Heart motif I needle tatted into a pendant by adding a silver bail to 2 picots that were touching in the center top of the heart. I also sewed on a 4mm clear Swarovski Crystal bicone bead to the center of the heart.
Now it's ready to slip onto the necklace of my choice! Yeay! I love it!

Needle Tatting: Clover Leaf Heart #2

Motif #4 of 25 Motif Challenge
Here is the second try at the Clover Leaf Heart! Much better! I felt like I knew what I was doing, and I also made the stitches tighter on the needle so much that I needed to use one of those little round rubber needle grabbers to pull the needle through. Okay now I can move on to another pattern!
Pattern by Mrs. J.M. Blackman Published 1917
Available in the Handy Hands Newsletter Volume 11 Issue 1

Sunday, February 25, 2007

Needle Tatting: Clover Leaf Heart

Motif #3 of 25 Motif Challenge
Today I started working on another needle tatting motif! I saw this heart in the Handy Hands Catalog it's called "Clover Leaf Heart" by Mrs. J.M. Blackman Published in 1917 the pattern is also in their newsletter Volume 11 Issue 1.
There are a lot of mistakes in this heart! But since I am a beginner I guess that's to be expected. I did see myself improving as I progressed with the pattern(starting on the right and working around to the left). I added close-ups of some spots that are messed up looking. It's like they got twisted...I'm not sure what went wrong but I know I was getting confused at those times so I may have twisted it around wrong or something. I also had never done the clover leaf before so that was very new to me. I noticed that my stitches were kinda loose so I started making sure they were nice and tight and that seemed to help too. I know I'm using the correct needle and thread so that is not the problem. I'm wondering if I'm not tugging the chains tight enough or am I tugging them too tight?
I'm going to try this pattern again and see if I can make it better. Wouldn't it make the most loveliest necklace? LOL I'm a necklace/pendant girl all the way! I'll use this messed up one on some Crazy Quilting since you add beads and embroidery on it anyway and it still looks nice even if it's not perfect.

I still have that needle tatting class coming up on March 2nd...so what I'm going to do if it is needle and not shuttle and if I have learned what the class was going to offer, I'll just try doing a pattern instead so that I can learn to read them and I can ask any questions I have...it's really frustrating to have questions that you can't just ask someone and show the work and pattern to them.

SRE Motifs

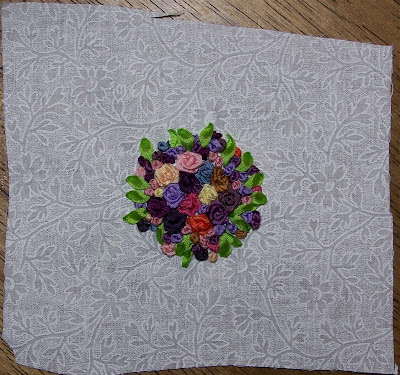
Here are 2 Silk Ribbon Embroidery Motifs that I designed and created for Lori to swap with her for some crochet lace she's made. She told me any colors so I chose to make 2 spring themed motifs the first being a leafy heart with sweetheart roses and colonial knot forget-me-nots. I backstitched using 2 strands DMC floss for the heart shape and then added 4mm ribbon stitch leaves as well.
The second motif I created a bouquet with sweetheart roses and colonial knots using a rainbow of colors. I used bits of leftover 4mm silk ribbons that I save for small projects and this fit perfectly, I didn't use 2 of the same color for the sweetheart roses. Then I added 4mm ribbon stitch leaves. She could make this into a button cover if she wants to since it is the perfect button cover size, or just use it for crazy quilting.

Family Photo Feb. 2007

Today we decided to take our family photo so here it is! Me, Gerard, China, and Madie!
China and Madie have their own blog too. Click Here to see it. They have been making doggy online friends. There are lots of dogs with blogs out there! Check out China & Madie's sidebar for a few cool dog blog links.

Saturday, February 24, 2007

Needle Tatting

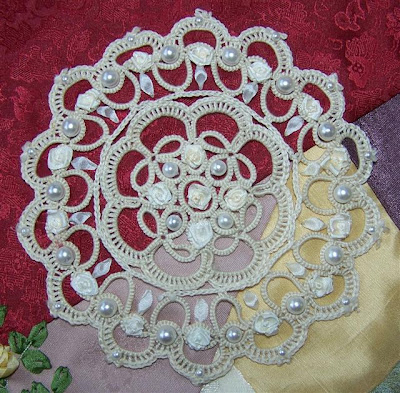
Well I learned the next method in needle tatting and created this medallion! I think I'm going to turn it into a pendant, but I could use it in CQ too, I still haven't made up my mind.
The method is the ring and chain method, and you do it by working with thread "off the ball" which is using thread still attached to the ball instead of cutting of an amount and working with only that.
I also joined in the 25 motif challenge Click Here to see it.
Motif #2

Thursday, February 22, 2007

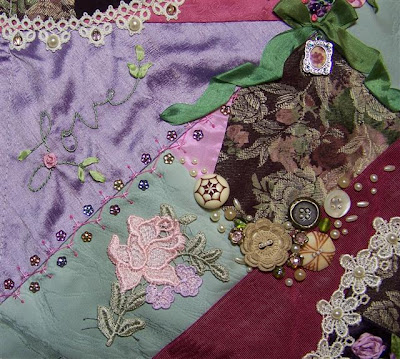
In The Garden RR: Debbie R's block

Here is Debbie R's block! I am the last lady to work on the block so I was putting on all the finishing touches. I believe I'm finished with it! Here is a little of what I've done.
I added a hummingbird charm near Jackie's beautiful SRE! It was a little awkward spot but I think the hummingbird successfully fills the space and points in all the right directions.
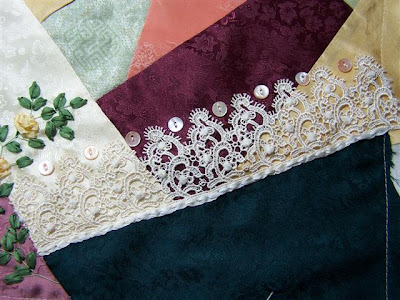
I added tiny size 15 green seed beads to the delicate ecru lace on both fans. I added pearls to the top of the bottom fan.
I added Czech pressed glass flower beads that are fire-polished to Lillian's pink seam treatment on the purple and green seam. The flower beads have a green size 15 seed bead in the center.
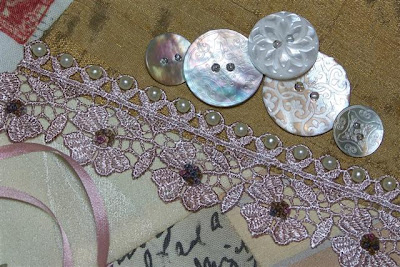
On this top fan I added alternating pearls and shaped glass beads to the tatting. I also added etched Mother of Pearl buttons to the fan in 2 sizes with clear AB size 11 seed beads in the center.
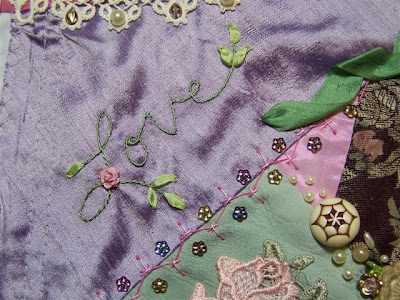
The 'Love' motif I added using silk buttonhole twist in the stem stitch and added a 4mm pink sweetheart rose and 4mm ribbon stitch leaves. This spot was an awkward one and the 'Love' seemed to work in the spot because the ends seem to point in the right directions to lead the eye around the block.
This button/bead trail is my first bigger sized one! The reason I added it was if you look at the overall photo you see the maroon fabric the seam just slides your eyes right off the block so I needed to stop it and hold the eye and lead it to another area of the block instead.

Wednesday, February 21, 2007

My Little Brother has a Baby!

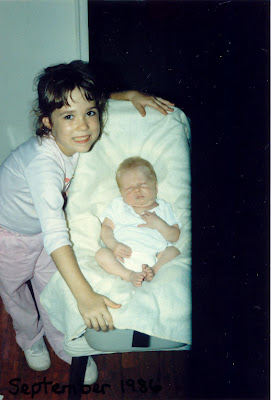
I love this photo of when my little brother Aaron Mark Johnson was born! I was so proud and excited to maybe get to hold "the baby"! I was 6 years old when he was born on 18 September 1986!
I remember before he was born my parents didn't know if it would be a boy or girl and were picking out baby names...well they had picked out Adrian for either and just change the spelling for boy or girl and then later went with Adrian (I don't remember the spelling for the girls) for a girl and Aaron for a boy...I had wanted a little sister until I heard this! I hated the name Adrian so I prayed that God would let it be a boy! LOL
Also our Grandma had sent me and my other little brother Isaac baby dolls to take care of in preparation to be able to "hold the baby" so I took care of my baby doll very well! It was a very serious matter! I did eventually get to hold my baby brother sitting on the couch of coarse and very carefully.
Aaron became my "little buddy" which was very fun! I could talk him into anything! Until he got older and didn't want to hang out with a sister, but by that time Mom had another baby, my little sister Joyce.
It did hurt my feelings a little when he "outgrew" me but I think we still have a special bond anyway. He used to grab onto the legs of unworthy boyfriends when we got older and would pester them to no end!
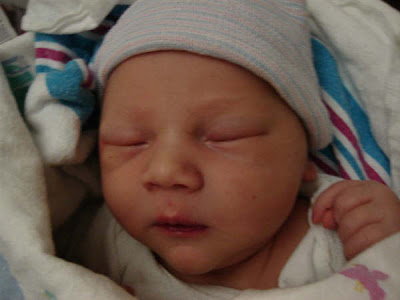
On 20 February 2007 my baby brother had a baby of his own! Nathan Marc Johnson was born at 5:10AM 8 pounds 11 ounces 21 inches long with a head and chest measurement of 13 inches! You see "Nathan" means "gift from God" and that is exactly what little Nathan is. Echo was not supposed to be able to have children due to cervical cancer, but God blessed her and Aaron with Nathan. Also it was a concern that he may need to have a c-section but God watched over him and Echo and let it be a natural birth! Praise God! I just know little Nathan is going to grow up to be one special young man, and I pray that he comes to know the Lord at a young age and is protected, blessed and used by God in mighty ways! I pray for Aaron and Echo that they would be Godly parents and have a strong relationship with each other, with Nathan, and most importantly with the Lord! In Jesus' Name AMEN
Here is Nathan Marc Johnson
Here is Aaron new Dad to Nathan
Click Here for Baby Nathan's Blog! I'm sure there will be lots of photos added soon so keep checking!

Tuesday, February 20, 2007

In The Garden RR: Jackie's block

Here is the overall block of the work I've done on it. I think I'm ready to send it on now. Since I had run out of the green to finish the rose motif and ribbonsmyth was out of stock so my hubby did some color matching for me! I'm not too good at scientific detail work, LOL, but Gerard has more patience than me so he figured out how to color match by mixing drops of colors and keeping tack and all that stuff! I'm so impressed!
On this motif Lillian had added to the block and had stitched pearls of different sizes to it. I thought it would look nice with a little more to it so I added some sweetheart roses and ribbon stitches. I think it adds another element of texture and creates a more romantic lacy feel. Looks kinda like wedding cake icing to me!Lillian had also added this lace and buttons so I embellished a little more by adding cotton chenille french knots in the centers of the flowers as well as a strip of split stitches along the edge in 4mm silk ribbon.Finally my finished climbing rose motif! I love it! It's a base of feather stitching with lazy daisy leaves and Melanie roses. I thought that butterfly looked nice there so I attached it too.

I think I'm finished...I kinda want to add more but I haven't one clue what more I would add! I'm not too experienced with seam treatments so my creativity is sorely lacking in that area.

**Update 21 Feb. Lillian gave me an idea to create this seam treatment. It is straight stitches fanning out but at an angle with a tiny size 15 seed bead at the base. I used some hand dyed by Norma thread given to me by Norma.
Now to send it on to Lillian again so she can do more work on it for Jackie!

Monday, February 19, 2007

A rose by any other name...

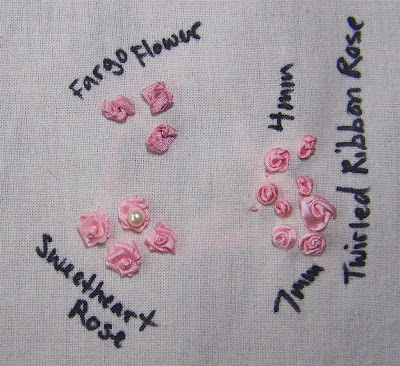
For the rose challenge this month I chose the Sweetheart Rose. Also known as the colonial knot/running stitch rose or french knot/running stitch rose. Sometimes it's referred to as the Fargo rose but it's made a little differently than the Fargo flower which starts it's running stitch from the base of the ribbon coming out of the fabric instead of closer to the needle end of the ribbon right after the knot.

Click Here for my video tutorial of the Sweetheart Rose

Click Here for instructions on how to create this rose from CQMagOnline

Click Here for Jo in NZ's

My reference for the Fargo flower is from Judith Baker Montano's book Floral Stitches on page #94

I like to create the sweetheart rose with a colonial knot and I like to zig-zag from edge to edge with my running stitch as I make mine.
I'm going to try using a bead instead of the colonial knot and I'd also like to try the real Fargo flower to really see a difference.

When I first learned to do it I found it easier to do in 7mm silk ribbon but now it is just as easy in 4mm silk ribbon like you see in the photo. Although it can feel tricky to learn at first once you know how to create this rose it becomes a very fast and easy rose to make. It's nice and tiny and is great for filling spaces too.
Here are my results! The Fargo Flower is more of a flower than a rose and would look nice as Marigolds or even a small Carnation. Then for the Sweetheart roses I tried from left to right a zig-zagged running stitch, then I made one with a pearl bead in place of the knot. I did that by bringing my needle and ribbon to the top of the fabric and then unthreaded the needle and took a piece of beading thread and looped it around the ribbon then threaded both ends into the pearl bead then I slide the bead down onto the ribbon rethread my needle and treated the pearl bead like the knot and started the zig-zag running stitches after it. I like the way it looks, it takes more time to do it since you have to add the bead but it wouldn't deter me from using it in small amounts. Then I made one by turning the ribbon around with each running stitch like in Jo's tutorial, and lastly I make a sweetheart rose by doing the regular running stitch instead of zig-zagging it.
I also tried out the Twirled Ribbon Rose and left it in the photo for comparison. The Twirled Ribbon Rose is the next rose in the Rose Challenge!

Saturday, February 17, 2007

Pink Pendant/Necklace

Today I created Pendant/Necklace to put up in My Etsy Shop! I'm currently having a 1 week after Valentine's Day sale on my embroidered jewelery!
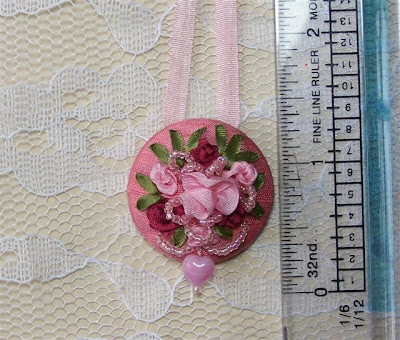
I liked creating this one, because I was trying some new things with it like the ruffled flower in the middle made out of 7mm pink silk ribbon and the beaded loops made with size 15 seed beads! I also did a beaded swag with a heart drop! The size of the pendant is 1 1/8 inch, and the heart drop dangling about a 1/4 inch from that.

Friday, February 16, 2007

CQ Heart

I embellished this CQ heart by just letting myself be free with it and just did it! It was fun and I love how it turned out!

Tatting Bracelet

I made my practice tatting into a bracelet! The pattern showed a ribbon woven through the inner threads so I took 4mm white silk ribbon and wove it in then attached ribbon connectors and a screw-type closure. I dotted a bit of Aleene's Fabri-tac Permanent Fabric Adhesive to the last thread on the tatting and pressed the ribbon on it to help it stay put. I love it! It's a little loose on my wrist but other than that it's fun to wear, very lacy!

Thursday, February 15, 2007

Needle Tatting

I did some more needle tatting by doing a pattern from the book to practice the Ring and Thread Method. I like it they have an example with a ribbon woven through the middle which I think is what I'm going to do. Then I'm going to turn it into a bracelet! It looks nice and lacy!
The first photo is the piece on a 8 1/2 x 11 paper so you can see the relative size. The other photos are close ups because I'd like to know if I'm doing things right or if there is anything I can do to improve. It looks a little lumpy to me...is that me? Or is it the thread I'm using or am I not making the stitches tight enough? Or is this just how it is? I have no clue.Here are the little flower and butterfly patterns from the book. Aren't they cute?! They will be nice to do for adding into CQ, very simple and fast.
Next I'm going to move on to learning the Ring and Chain Method.
I really enjoy doing needle tatting! The motion is nice and it's enjoyable like embroidery is to me. I'd also like to try nicer thread. This thread I have is learning quality only and is really rough and not very soft. Maybe I'll try the next size smaller or a different brand thread. Oh I have some DMC Perle Cotton Size 8 in black so maybe I'll try that.

Wednesday, February 14, 2007

Needle Tatting

Here is my first attempt at needle tatting! Pretty good I think for just learning. The book "Handy Hands Learn Needle Tatting Step By Step Kit" was really good with instructions. It really was major easy to learn! If you've been wanting to try tatting I say go for it! I joined more thread into it too. I do have a few knot questions. You have to make a knot when you join new thread and I just wasn't sure how it was done...maybe I'm just over thinking it. I just tied the 2 ends together to make a knot that way.
My needle tatting class was canceled! Major bummer for me, but there is another on March 2nd so hopefully I'll make that one. Meanwhile I'm going to practice my Ring and Thread Method some more by making some of the small projects before moving on to the Ring and Chain Method.
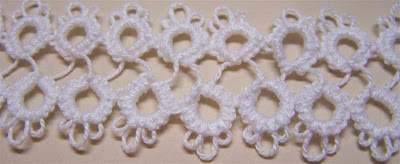
What you see above is the Ring and Thread Method because...dun, dun, dun....it's rings with threads connecting! LOL But the other thing that makes it different is that you cut an amount of thread (2-5 yards at a time) from the ball and work from that and join thread in if you need more for your project. Also anytime a pattern would call for 1 shuttle the Ring and Thread Method is the way you would work it for needle tatting that pattern.
Click Here for on-line instructions if you would like to try it. It's really super easy!
I'll tell you about the Ring and Chain Method when I learn how to do it!

Heart for my Valentine!

Here is my heart I made for my Valentine! It's red because I love him deeply, white embroidery because I'd marry him again, and the chain stitch hearts in the center with our initials is our unbreakable bond.
I made it into a pin so he can keep it close to his heart pinned inside his jacket.

Tuesday, February 13, 2007

Windsong Jewels: My work on Cher's Block

All finished! I love it! It looks to me like a Victorian lady's precious treasures!

Windsong Jewels: My work on Cher's Block

Here is more of my progress on Cher's block! I'm almost finished! Just a few more roses, some leaves, get the pearls sewed on and sew down the button cluster, as well as figure out a seam treatment for the little spot above the middle writing.
I added sweetheart roses with 7mm Ecru ribbon and some colonial knots for buds, a heart charm, frosted glass flower buttons, and french knots to the centers of the floral lace flowers using some Caron Wildflowers "Burnt Toast" thread.

Monday, February 12, 2007

When I was a kid...

Pat Winter had the idea to start blogging bits about when we were kids and I love the idea so I'm going to pick it up and start doing it as well.
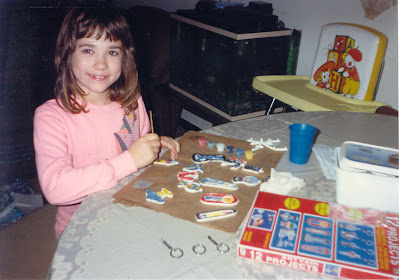
This photo has the date Feb. '89 stamped on the back, but that was when it was developed not necessarily the date it was taken...my guess is that was taken around early Jan. '89 because it is right after Christmas. This was taken in Vicenza, Italy where my Dad was stationed in the Army, we lived in military housing. I am 8 years old in this photo. And the art kit I had bought with Christmas money I had received. I was always dreaming over the art kits and whenever I would get gift money I would get some. Whenever I pass by these kits in stores I always tell hubby how I would want them and get some with gift money so it was nice to find this photo.
Oh and I wanted to say the sweat outfit I'm wearing was one of my favorites because it was so soft and comfy (and I liked the color). I loved to dress up in dresses but I also wanted to be comfortable and if an outfit scratched, poked or was uncomfortable in any way I refused to wear it. I'm still like that.
One morning my Mom was trying to get me dressed for school but I hated the shirt she was trying to make me wear it scratched! So she told me fine, you can dress yourself then! I was so happy! Then one day the kids in my class made fun of me for my clothes not matching and from that day on my clothes had to MATCH! Which further irritated my Mom when I would insist that something didn't match. Don't get me started on shoes! My parents never understood that the shoes they wanted me to like HURT my feet, eventually I think they gave up and would let me pick out my own shoes which was usually some slip-on ballet flats that I wore to death, and since they were always a cheap price they didn't mind and at least I had shoes. I probably looked pretty silly wearing those with everything but that's what I wanted. I do think I had some tennis shoes though.

Sunday, February 11, 2007

Windsong Jewels: My work on Cher's Block

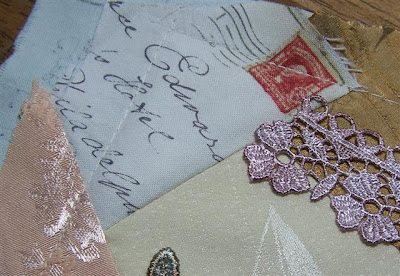
I fiddled with the dyed motifs by adding more green to the leaf and making the flower lace a warmer shade. I love the pearls added to the floral lace It makes me think of the buttons on a Victorian dress. I also picked out some ribbons to use and ironed them. I'm going to do 2 more folded roses with the 13mm ribbon and then some colonial knot roses with the 7mm Ecru ribbon. I like the nice light sage 4mm and will probably do some lazy daisy leaves with it. I was also thinking of spreading some rose petals on the block by using the 13mm or 7mm ribbon and doing the ribbon stitch. The block just makes me think of a Victorian lady's vanity table, or the contents of her keepsake box where she has bits of lace, flowers, love letters, and such.
It makes me think of my favorite movie Pride & Prejudice. I never get tired of watching that one! It is so well done and I'm always noticing something new like their jewelery, dresses, embroidery, gardens, and china. Not to mention that I think it's a very well done book into movie, if you haven't seen it I highly recommend it.

Saturday, February 10, 2007

Learning Needle Tatting

This is the class supplies I got for the needle tatting class I signed up for at my local Micheal's! I'm very excited to try out tatting! The class is on Thursday the 15th but so far I'm the only one signed up and there needs to be 3 signed up for the class not to be canceled. I hope that it's not canceled because I really want to learn. There is another class scheduled for March 2nd so if this one falls through I hope that one will be a go. In the class I'll be learning to do a medallion, and it looked really pretty too.
*Update 14/Feb* It's been canceled! Bummer! Well March 2nd is another class so I'll transfer to that one!

Baggie RR

Here is my baggie back from the Baggie RR I was in! Wow can you believe all of that!!! I love it all, thank you so much to all the ladies who added to my baggie!

Friday, February 09, 2007

Windsong Jewels: My work on Cher's Block

I love the colors of this block! So soft and romantic, and I like the love letters fabric! I'm doing some tryouts with embellishments and I did some lace painting for it. I think I still need to fiddle with the color in the floral lace because it looks too pink when the tones in the block are warmer shades like peach and apricot. I also puffed up the envelope in the corner by making a slit in the foundation fabric and stuffing fiber fill inside it. I got that idea from Jo in NZ you can see her work Here. I would never have thought to do that had she not blogged about doing it. I think it gives the envelope the look of containing some precious love letters long treasured.

Thursday, February 08, 2007

Pendant

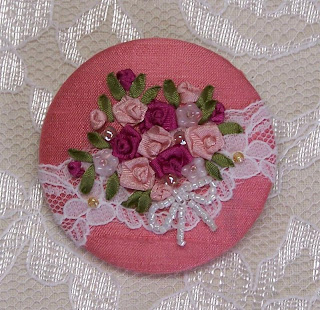
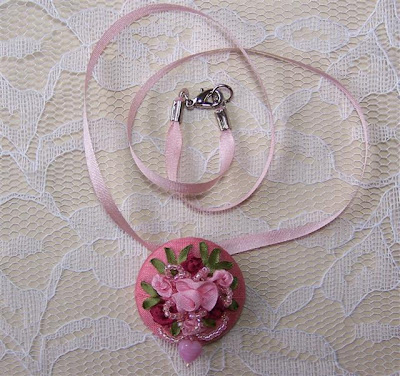
I've been working on this pendant for myself and as a trial to make some for my Etsy Shop. It is similar to the pink bouquet brooch I made since I loved it so much I wanted to try it in pendant form. It's really encrusted and it shimmers wonderfully! I also created the silk ribbon necklace that it is attached to, since the pendant is really lightweight it doesn't stress the silk ribbon necklace. The pendant is made out of a 1 1/8 inch button cover. I used 4mm and 2mm silk ribbon for the design and #11 seed beads in the flowers and #15 seed beads for the bow. The necklace is 4mm silk ribbon with crimp ends and a screw-type clasp.

Tuesday, February 06, 2007

Heart Brooch

I finished another heart brooch tonight, but the photo just doesn't do it justice! I also put it up in my Etsy Shop. I like how it has a more elegant Victorian feel.

Monday, February 05, 2007

My Etsy: Honey Bee's Boutique

I put this pink bouquet brooch up in My Etsy Shop to see how it goes. This one is my favorite, I've been thinking of keeping it for myself too! LOL I'm out of supplies to create more brooches but I have ordered some from Ribbonsmyth.com. I bought some smaller size ones at WalMart to make some pendents with. I'm going to make a pendent for myself first and then 2 to place in my Boutique.